Hi! I am going to tell you how to do crowd animation with Blender.
This methods requires the use of a tool known as Absolyte Vertex Keys. You will find a good basic documentation at Blender.org.
Absolute Vertex Keys, and also Relative Vertex Keys, are very efficient tools giving a total control on the displacement of each Vertex of a mesh. They are marvelous tools for animation, and are mainly used for facial animation.
After studying these tools in depth, I discovered that they have in fact quite unlimited applications in various domains.
Crowd animation is only one of them.
The tutorial is included in the Text Window of this blend file, but you will find it also on this page.
• crowd_animation_tutorial.blend
Launch the animation (Alt+A).
- On Layer 1, you will find the
most important part.
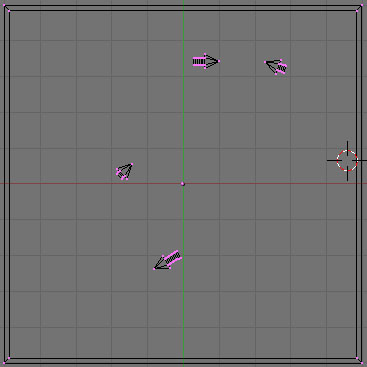
- It is a simple mesh including
the border of the animation area,
and several arrows.
- These arrows are both identified
by their material colors, and by the
associated symbol.
- This double signalling is usefull
to identify the arrows in object and
edit mode as well.
- I use a simple barcode in this example.
The bars number represents the number of
the arrow, and so, the number of the linked
character.
- The mesh supporting the arrows is animated
by an AVK curve. It is the simples way to
give each arrow a position and direction
with accuracy on the time scale.
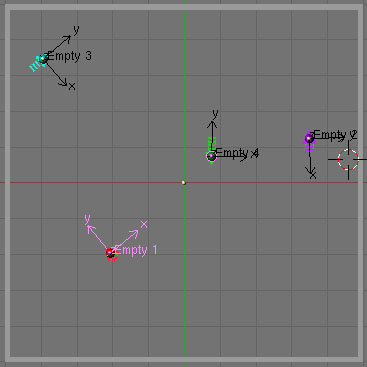
- Empties are added. They may not be used, but
allow you to delete or change the characters
without needing a new vertex parent operation.
They are a plus in your workflow.
- Each Empty is linked by Vertex Parenting to the
3 points of the arrow triangle.
- Each character will be parented to an Empty.
-It is not more difficult.
- In this example, characters are replaced by
simple pawns (on layer 2), but you will be able
to use every object you want:
- Standalones characters animated by AVK or RVK.
- Character animated by an armature.
- Cars.
- Airplanes.
- Birds... and much more.
- This example uses a simple plane as base mesh,
but you can use the 3 dimensions and allow your
crowds walk over mountains and hills if you want.
- The basic decor is on layer 3.
Someone on a forum asked me the following question. As I think that the answer could be usefull for other users, here it is:
I like this idea but is there a way to edit keys after they are set? When I switch to Edit Mode, all the arrows move to their final position (the final key positions) no matter where my timeline is. I can only see the individual key positions in Object Mode but of course, I can't edit them there.
So, if I wanted to change their position in the middle of an animation, how could I do it?
First, you should always work with a linear Speed Ipo curve, set in Extend mode. This gives an curve not limited in time.
Do not make confusion between AVK (same for RVK) Keys which are spatial keys, and keyframes, which are temporal keys!
Do not pay attention to the time line for now. Moving your cursor on the time line will show you the animation later, but it is useless for editing the keys.
When you enter in edit mode, the 3D window shows the arrows where they are at the instant represented by the current selected Key. Not at the instant pointed by the keyframe green line or your cursor on the time line. You see the arrows at their final position because the key selected when I saved the file was the last one. That's all.
Forget the time line for now.
While you are in object mode, click with the Right Mouse Button to select the key you want to edit.
All the arrows are now at their place at the moment defined by the selected key.
Enter in edit mode: You can select your arrows (be carefull, select all the vertice of the arrow in order to avoid deforming it).
You can move them at will.
When you exit from edit mode, the new position of the arrows are stored.
Do the same way for each key you want to edit.
If you want some arrows to have a special displacement between two existing keys: select the previous key.
Select a frame. In the Ipo window, the vertical green line intersects the Red line of the Speed Ipo curve.
Enter in edit mode, hit I to Insert a new key. A new blue line appears at the intersection of the green line and the Speed Ipo curve.
You can easily displace the blue line (spatial key) in time by selecting it (RMB) and moving it with the mouse.
Note that you are moving a spatial key, so moving it "in time" means that the intersection of the blue line with the red Speed Ipo curve will move in time.
The Blue line itself will move vertically!
Hit G to move it. Hit LMB to validate the position, Hit Escape button to release the curve if you change your mind and dont' want to move it.
Remember that an AVK key is like a photo of the mesh at a given instant.
You can have as many photos as you want (maxi one by frame).
I hope that this example will have helped you in the understanding of the interest hidden under AVK.
Please feel free to send me your comments by E-mail.
Copyright 2005. Philippe ROUBAL. FRANCE.
The site www.3d-synthesis.com is hosted by www.amen.fr - FRANCE.